DISNEY'S MAGIC ARTIST
 |
Access Route
Start Ø
Programs Ø Kid's World Ø Disney's Magic
Artist
Ease of Use
Easy ll¡¡¡
Difficult
 Yes
Yes
 Yes
Yes
|
Disney's Magic Artist is more than just a fun way to
draw and paint on your computer. It is the easiest way to create your very own works of
art with some of Disney's most popular characters.
1/7- GETTING STARTED
A- Before you start
Before you start Disney's Magic Artist, quit all other
applications and deactivate the screen saver in order to optimise colour display and
animations.
Insert the Magic Artist CD-ROM into the CD-ROM drive.
You can access the Disney's
Magic Artist online manual by clicking
here.
B- Magic Artist studio areas
Magic artist reproduces the real
environment of an artist's workshop through its three studio areas:
1- Magic Artist Desktop

This is the first studio you see when you
start magic Artist. 12 basic tools and over 300 Disney Magic Stamps including
characters fun props and backgrounds give you limitless creative possibilities.
2- The Gallery
The gallery allows you how to organise your
drawings into customised sketchbooks and create exciting slideshows with music and video
effects.
3- The Lesson area
In the lesson area, you will learn how to
draw your favourite Disney characters. Real Disney artists will provide you with good
advice to produce wonderful and original artwork.
2/7- THE MAGIC ARTIST
DESKTOP
This is the first studio area that you reach
when you start Magic Artist.
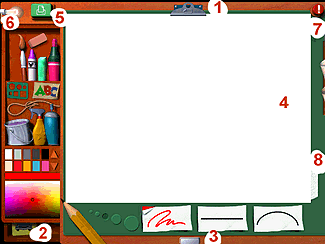 |
- New, clean page / Save your work
- Tool drawer / Stamp drawer toggle
- Create slide show
- Lesson area, (click green desktop area)
- Print your work
- Exit the application
- Undo your last action
- Select a texture
|
Click on a tool on the left drawer to use it
. It will leave the drawer and reappear at the bottom of the desktop with different style
options. Choose the style option you want to use, then click and drag the cursor over the
canvas and... off you go!
A- Tool Style Options
Each tool of the drawer has special features
to give you more flexibility when creating your work. The tools options are displayed in
the bar next to the tool at the bottom of the desktop.
1- Size button

Click on one of the five different-sized
circles to define the size of the effect made by the selected tool.
2- Pencil

|
Freehand |
Straight
line |
Curved
line |
3- Paintbrush

|
Oil paint |
Water
colour |
Fingerpaint |
4- Marker

|
Regular round tip |
Flat
tip |
Elliptical
tip |
5- Spray can

|
Regular spray |
Spatter
spray |
3-D
paint |
6- Eraser

|
Hard eraser |
Soft
eraser |
Squeegee
tool |
7- Text tool

|
Select a font
size |
Choose
a font |
Choose
a style |
8- Shapemaker tool

| Choose a shape |
Outline |
Solid
white fill |
Solid
colour fill |
The shapemaker tools allows you to draw square and circles
but also triangles and diamonds.
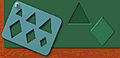
To toggle between square/circle and triangle/diamond
templates, click on the shapemaker tool.
9- Imagespray tool

Choose from a bunch of funny images by clicking on the right
and left scroll arrows and spray colourful images over the canvas.
10- Paintbucket

|
Solid fill |
Gradient
fill |
Pattern
fill |
Solid fill
Single, uniform colour fill
Gradient fill
blended colour fill. Click on the left or right scroll arrows to select
the direction in which you want the colours to flow. You can select two colours to blend.
The first one can be a colour from the Colour selection tool. To define the second colour,
click on the small circle in the Gradient fill paint splotch and select the colour from
the appearing Rainbow area.
Once you have selected the colours, click on the canvas. The canvas will turn grey.
Move the mouse in any direction to set the path for the blend and click again.
Pattern fill
Use the scroll arrows to choose from a series of fun pattern and click on
the canvas to cover whole areas with the selected pattern.
11- Rope tool

|
Rectangle rope |
Freehand rope |
Blur |
Emboss |
Use the rope tool to move sections of your artwork to another
location. Click on a rope and define the area you want to move on the canvas. A glowing
line will surround the area. Click on the selected target area to move the selection.
You can also apply an embossed or blurred effect to an area by choosing the
appropriate option.
 TIP
TIP
TWISTED TOOLS
The drawer tools can be very tricky: They can turn into wacky, twisted tools. Select a
tool. As it appears at the bottom of the desktop, click on it again and... watch what
happens! Now let your creativity explode.
To quit the twisted tools mode, click on the tool again.
B- Choosing colours
1- Available colours
 |
Colour patches |
| Rainbow area |
Millions of colours are available in Magic
Artist to create your best artworks. After selecting a tool, you can select a colour from
the colour patches on the drawer or enjoy even more colours in the rainbow area just
below.
2- Matching a colour
If you wish to match a precise colour from
your canvas, place the cursor over this colour area of the canvas, depress and
maintain the <Ctrl> key and click the mouse. The selected colour
automatically appears over the Rainbow area. Any tool used will now paint with this
colour.
3- Adding a texture
The texture tab at the bottom right side of
the canvas generates a texture in the drawings made with the pencil, crayon, chalk and
watercolour tools.
Select a texture from the texture samples by
clicking on the texture. The chosen texture will then appear in your picture as you draw,
as if you were rubbing the actual tool over a patterned surface.
C- Disney's Magic Stamps
Toggle to the stamp drawer by clicking
beneath the tools drawer and choose from your favourites characters, select one of the
numerous fun backgrounds and colourful props to transform your pictures into real pieces
of work.
1- Type of stamps
You can choose from three stamp categories:
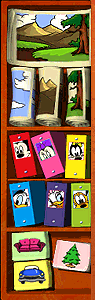 |
Backgrounds
These stamps include complete backgrounds a well as simple pictures for
the sky, the midground or the foreground of your picture. |
Characters
These stamps include six of the favourite Disney characters in hundreds of
poses and costumes: Mickey, Minnie, Goofy, Donald, Daisy and Pluto. |
Props
A wide variety of props are available behind the three prop buttons. |
2- Getting around with stamps

When you click on a stamp, several choices
are displayed at the bottom of the desktop. Click on the right and left scroll arrows to
access the complete stamp collection.
To place a stamp on the canvas, click on it
drag it to the desired location. A small rectangle will appear and help you to
position your stamp.
TIP
Double click on a stamp to quick-position it at the centre of the canvas.
A stamp positioned on the canvas first appear
in blueprint form. You can colour it, size it before you make it permanent.
| Flip horizontal |
|
Size |
| Flip vertical |
Rotate |
When you select a blueprint, it becomes
surrounded by a box with a small icon in each corner. These icons allow you to scale,
rotate or flip your blueprint.
To move a blueprint, select it by clicking on
it, then drag it to the desired position.
To remove a blueprint, select it, then hit
the <Del> key or drag it off the canvas.
Now it is time to complete your stamps by
colouring them. Click on one of the three choices on the painter's palette:
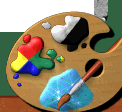 |
Black
and White splotch
Colours your stamp in black and white.
Four colour splotch
Colours your stamp in classic cartoon colour.
Sparking paint splotch
This is the magical touch for your picture! Brush stroke by brush stoke,
the stamp creation is drawn and painted with full colour and shading. |
D-Saving and creating new artworks
To get a new fresh blank sheet on the canvas,
click on the clip at the top of the canvas.

Your current artwork is automatically saved
to the Gallery.
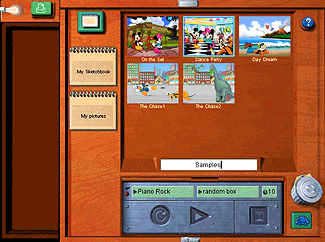
3/7 - THE GALLERY
The Gallery is the place where all your work
is automatically saved and where you can organise your drawing to create astonishing slide
shows.
To enter The Gallery, click on the button at
the bottom of your desktop.
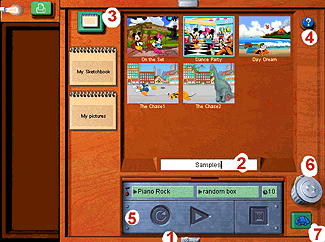 |
- Return to Desktop
- Name your sketchbook
- New sketchbook
- Help
- Viewer panel
- Dustbin
- Empty dustbin
|
You will see all the images you have created
in the Magic Artist Desktop in miniature size and gathered into a sketchbook. If you have
created more than 9 images, they cannot be all displayed at one time in the Gallery. Use
the blue arrows to scroll up or down to the images that are not currently displayed.
Each image can be titled. Just select an
image and type a title in the space under it.
A- Working with sketchbooks
To save your collection of drawings into a
sketchbook, click on the title area and type in the name you want to give to your
sketchbook.
To create a new sketchbook, click on the New
sketchbook icon. You can create up to 50 sketchbooks.
To open a sketchbook, just double click on
it.
B- Organising your sketchbook
You can organise the order of your images in
your sketchbook. To move an image within your sketchbook, select it and drag it to the
desired location. You can use the same method to move an image from a sketchbook to
another. Just drag the image to the desired sketchbook on the left of the screen.
Each sketchbook can contain up to 50 images.
To get rid of unwanted images, drag them to
the dustbin. They will remain in the dustbin until you click on the Rubbish Truck to empty
the dustbin. This allows you to retrieve images before they are completely deleted. To get
an image out of the dustbin, click on the dustbin. It will spill out the last three images
you dragged in.
 NOTE
NOTE
The dustbin can contain up
to 3 images at a time. If you drag more than three images to the dustbin, the oldest ones
will be permanently deleted.
C- Editing your pictures in The Gallery.
Double click on the image you want to edit.
It will automatically appear into the Magic Artist Desktop. Make all the necessary changes
and finally, click on the button at the bottom of the desktop. The modified image appears
back in The Gallery.
D- Printing your pictures
You can directly print an image from The
Gallery: select it and click on the print button  .
.
Export your work to a floppy disk so that
your family and friends can enjoy your best images on their own computer. To export an
image, insert a blank floppy disk into the floppy drive, select the image you want to
export and click on the disk button on the viewer panel.
E- Making your own slide show
Combine your sketchbook artwork with
music and transition effects to create amazing musical slideshows.
Click on the Open Viewer Area to reveal the
Viewer panel:
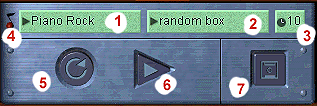 |
- Music selection
- Transition effect selection
- Exposure time
- Music prelist
- Loop slide show
- Play slide show
- Export pictures
|
You can add the three following elements to
each image of the sketchbook:
- Music
Select from the pop-up menu the type of music you want. Click on the red
music note to hear your music selection before you link it to the image.
- Transition
Choose the video transition effect you want between the selected image and the
next one.
- Exposure time
Select how many seconds you want the image to stay on the screen.
Finally, click on the Play button to enjoy
your slide show.
Click on the Loop button to loop back your slide show to the
beginning and replay it.
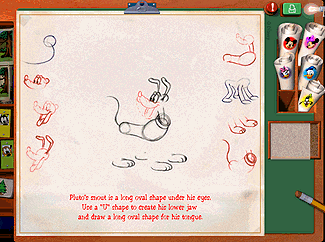
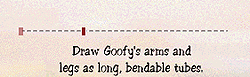
4/7- THE LESSON AREA
Watch and listen real Disney Artists share
their sketching secrets to draw Mickey, Minnie, Donald, Daisy, Goofy and Pluto with fun
instructions and step-by-step demonstrations.
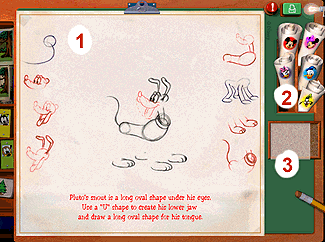 |
- Model sheet
- Select model sheet
- Use tracing paper
|
To enter the Lesson area, move the cursor to
the right edge of the Magic Artist Desktop. Just click when the cursor changes to a white
arrow.
A- Watch the artists at work
Click on one of the model sheets on the right
side. The sheet will open onto the art table. A brief slideshow will tell you the history
of the character.
After this short introduction, you will see
the character's basic body part cluster on both sides of the model sheet. Click on each
step, beginning from the top left corner for best results.
In the centre of the model sheet, watch how
each body part is drawn, line by line, and listen for instructions and tips as you might
want to do it yourself...
B- The slider bar
Once a body part has been drawn, click
anywhere on the centre of the screen to make it animated. A slider bar appears at the
bottom of the model.
It tracks the poses in the animated sequence.
Click and drag the button on the slider bar to view each pose separately.
C- Now, draw it yourself!
Try out your new drawing skills with the two
fun ways of drawing:
- Follow the step-by-step lessons with pencil
and paper; or
- Use the tracing paper on screen.
To place the tracing paper over the model
sheet, double-click on the bulletin board under the character model sheets.
Choose a size for your pencil and... start
tracing!
To erase, click on the pencil. It turns to an
eraser. Rub the cursor over the lines you want to delete. Click on the pencil again to
return it and resume tracing.
To undo your last pencil stroke, click on the
red Undo button 
Click on the clip at the top of the canvas to
make a new start on a new fresh piece of tracing paper. Your previous work will be
automatically deleted.
D- Printing and saving
To print you tracings, click on the Print
button
NOTE
Disney's Magic Artist only
prints your tracings. Step-by-step drawings and animations cannot be printed.
To save your tracings, drag your tracing
paper sheet to the bulletin board. If you exit Disney's MAgic Artist with a tracing on the
model sheet area, it will not be saved . Move them to the canvas on the Magic Artist
Desktop to save them.
E- Customise your tracings!
Move your tracings to the Magic Artist
Desktop and add colours, texture... and more!.
First, go back to the Magic Artist Desktop:
move the cursor to the left edge of the Lesson area. Just click when the cursor changes to
a white arrow.
In the Magic Artist Desktop, you will see
part of the bulletin board sticking out of the lesson area on the right side of the
screen. Click and drag the sheet up onto the canvas over the work that you have created on
the Magic Artist desktop or on a new blank canvas.
Remember: the tracing paper is transparent.
So, whatever is behind it remains visible.
5/7- EXITING DISNEY'S
MAGIC ARTIST
Your can exit the program at any time from
any of the three studio areas. Just click on the light bulb at the top of the working
area.

All your artwork and sketchbooks of the Magic
Artist Desktop and of The Gallery will automatically be saved.
6/7- PARENTAL MODE
Parents can access this mode from anywhere
within the program by pressing <Ctrl>+<Space Bar>
simultaneously.
In parental mode, you can access the menu bar
and control several program functions such as printing or autosave.
The parents' help file is available from
Windows start menu:
Start Ø Programs Ø Kid's World Ø Extra Ø Disney's Magic
Artist Ø Disney's Magic Artist Parents' Help File
7/7- MAGIC ARTIST ON THE
WEB
Visit the Disney's Magic Artist web site at:
http://www.disney.com/DisneyInteractive/MagicArtist/index.html